I would say, Scriptlets are one of the coolest implementations in USD. It’s unfortunate that it didn’t get much focus in the help documentation or in walkthroughs of MSDN.
Here is how I have used this feature in one of our USD Implementations.
One of the business requirements for us is “Users who have specific security role only, Should be able to start “a” application”.
There is no direct solution (*as far as I read in USD documentation) for this problem except if you use “Configurations” feature which is really cumbersome and may not be really useful if you have to maintain it with dynamically changing security roles.
After some good amount of study on different features, I found this “Scriptlets” which has this special feature or ability to call a method and capture its response via USD configurations. That’s it, little bit more study and work out gave a wonderful solution for my problem .. Happy days.. 🙂 Thought this might be helpful for others too and so here are the steps …
NOTE:
This is one of the way I used Scriptlets and there can be lot of other uses might be there and my intention over here is like this also we can use Scriptlets. Also, Below are the steps to address the mentioned requirement.
This method requires some C# skills + CRM skills and also basic understanding of USD and its components.
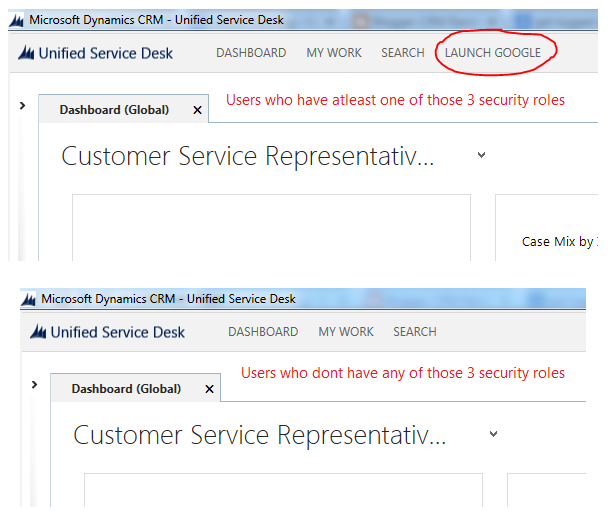
Scenario : I want to enable the application “Google” in tool bar only if the logged in user has a security role “Sales Person” or “Sales Manager” or “System Administrator”.
Steps 1 to 4 : Creation of a simple hosted control. You can directly skip to Step 5 if you are comfortable with creating a tool bar button and launching a hosted control.
- Create a new Hosted Control with name Google

- Create a new Action call named “Navigate to google home page”

- Create a new toolbar button


- Add the previously created action call to this newly created button.

With this, we are done with Google tool bar button which is available for all users .. (Give a quick look at your USD now just to ensure it is working as expected).
Good !! Let’s move to the next steps.. The Actual coding bits.. Suite up your Visual Studio..
- Create a Blank Solution and add a new Class library project with name “CRMDataProvider”, This will help us in getting the security roles of the user from the CRM system. Please note that this is not mandatory to have it in a different project, But it is best practice to separate the logic.
- Create a new Class file “CrmData” and inherit it from AifServiceBase
- Implement a method “GetUserSecurityRoles” which will simply return a list of logged in user’s security roles.
 public class CrmDataProvider : AifServiceBase

    {


        public List GetUserSecurityRoles()

        {

            List rolesList = new List();

            string fetchXml = @"


      ";


            var result = this.CrmServiceClient.OrganizationServiceProxy.RetrieveMultiple(new FetchExpression(fetchXml));


            foreach (var item in result.Entities)

            {

                rolesList.Add(item.Attributes["name"].ToString());

            }

            return rolesList;


        }

    }
- Create a new Project with name “USDCustomHostedControls”. (That is how I named my project while developing, If you have a better name for your project, you can happily go ahead. However, you have to ensure to follow the same name in further steps.. Please make sure..)
- Add a new USD Custom Hosted Control to the project with name “HiddentControl.Xaml”. As suggested in the name, this control is a hidden control and helps us in getting the security roles.
- In the onload of the control, Get the List of current user’s security roles and store it in a private variable.
 private List userSecurityRoles;

        public HiddenControl(Guid appID, string appName, string initString)

            : base(appID, appName, initString)

        {

            InitializeComponent();


            this.Loaded += HiddenControl_Loaded;


        }


        void HiddenControl_Loaded(object sender, RoutedEventArgs e)

        {

            CRMDataProvider.CrmDataProvider crmData=new CRMDataProvider.CrmDataProvider();


            userSecurityRoles = crmData.GetUserSecurityRoles();


            this.Loaded -= HiddenControl_Loaded;

        }
- Create a public method that accepts a string “security role name” and returns True/False based on the role availability in the list of security roles variable.
 #region User Code Area


        public  bool UserHasRole(string roleName)

        {

            return userSecurityRoles.Contains(roleName);

        }


        #endregion
- That’s it, We are done with the Coding part. Simple yet elegant. Now, Build the solution and Copy the output dlls into “<> (typically C:\Program Files\Microsoft Dynamics CRM USD\USD)”. If you have used the same naming convention mentioned above, then the 2 files you have to copy is “USDCustomHostedControls.dll”, “CRMDataProvider.dll”.
- Create a new hosted control for the hidden control to sit in a hidden panel. Keep an eye on the Name of the Hosted control. This is a key for us in the next step as Scriptlet uses the same name to call the hosted control.

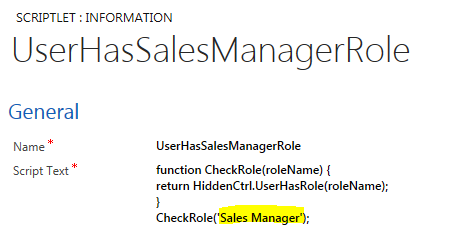
- Let’s create the Scriptlets. Navigate to Settings >> Unified Service Desk >> Scriptlets, Create a new scriptlet that will check if the user has “SalesPerson” role.
You can write sort of Javascript code function within Scriptlet, call the hosted control’s code behind method (ie. UserHasRole) .. Like ..
function CheckRole(roleName) {
return HiddenCtrl.UserHasRole(roleName);
}
CheckRole(‘SalesPerson’);
So, the newly created scriptlet should look like..

- Repeat the same for the other 2 security roles (Sales Manager, System Administrator)

- Hosted Controls read, Scriptlets also ready. Only thing left out is Using the Scriptlet. Open the Toolbar button control created in the Step 4 and add the below condition to the “Visible” condition of the control.
“[[$scriptlet.UserHasSalesPersonRole]]”==”True” || “[[$scriptlet.UserHasSystemAdminRole]]”==”True” || “[[$scriptlet.UserHasSalesManagerRole]]”==”True”

That’s it, Launch your USD and see the difference with & without the above roles..
Some of the important points to know about the Scriptlets –
- Scriptlets execute only once during the initial load of the application
- We can use Replacement parameters in the Scriptlets
- Scriptlets that are involved with Session based Replacement parameters (ie Contact Name, Account name etc), will execute at the time of Session start and will vary for each session.
- Hosted control name used in the scriptlet should match exactly as shown above. Note that, we have to use “Name” of the control , Not “Display Name”. If the hosted control has Spaces in its name, then replace Space with Underscore (“_”). Ex: name of the hosted control – “Hidden Control” then in the Scriplet it should be “Hidden_Control”.
That’s it for now .. Hope this helps in further exploring the Unsung hero Scriptlet…
-Srikanth

Hi,
im trying to use a scriptlet to set the text in a Call script. Depending on if im viewing an account or contact the call script should change. I have created an scriptlet with the name welcome and i'm trying to use the scriptlet in the call script with [[script.welcome]] but it doens't work. Do you have any idea?
LikeLike
can you share what is the content in scriptlet, what are the steps your doing and any more detailed informtion ?
LikeLike
can you share what is the content in scriptlet, what are the steps your doing and any more detailed informtion ?
LikeLike
How can i find any value using lookup field? Suppose on Case form i have lookup of Contact & I want to access dob field which is present on contact entity. please help with the code example.
for example we use- var title= “[[incident.title]]”; to get Case title.
I am not sure, Can we use below code-
var dob =”[[incident.contact.dob]]”;
Please reply, My email ID: anuverma033@gmail.com
LikeLike
Hi,
I get Object reference not set to an instance on object, I feel it coz its not getting System Userid.
Any help on this, Thanks in advance
LikeLike
ap ssc results 2017
LikeLike