
Last night I heard about this requirement from one of my close friends and frankly speaking when I initially heard about it, I though it should be pretty straight forward and we should have good amount of examples out there in the www. But on to my surprise I barely can see very few examples in bits and pieces, here and there; Moreover, many of these examples (including in MSDN) are referring to the old Azure Classic site to do the app registration which is much different than what we have in the current Azure portal.
Henceforth, thought like it would be helpful to write an end-to-end example on how do we connect to Dynamics 365 webapi from a console application. Let’s start !!
There are 2 major steps involved in the process.
- Register the application with your Azure subscription
- Build the Console Application – Use the Client Id & Authority URL to connect to WebApi and do your “stuff”.
Before going into the detailed steps at this point, I would like you to ensure that, you have azure subscription and your crm (preferably both of them in same tenant). If it is in different tenant you might have to follow slightly different process which I will try to cover in next blog. For this post, I have created a Crm Trail organization and I will be using the same trail edition for Azure as well.
Registering the Application
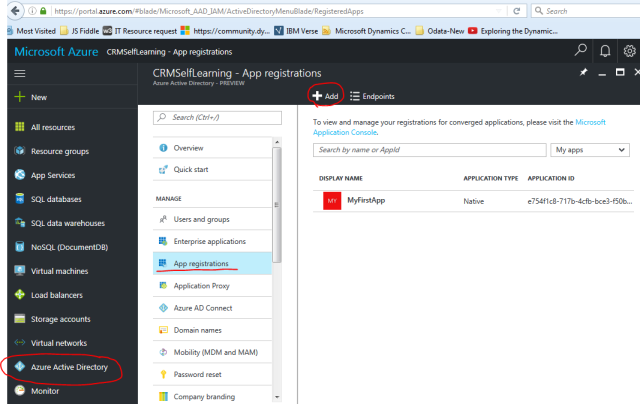
- Login to https://portal.azure.com, on the left navigation click Azure Active directory and click Add button on the top menu
ADD New App Registration - Provide your desired name for the App registration. Note that it is not necessary to be the same Console application which you are going to build to connect to CRM. You can use any name but should be unique in the app registrations.
- Select the Application type as Native (definitely we are not building any WebApplication/Web Api)
- Provide a redirect URL. So, this is the url in general once after authentication AD will redirect to. In our case because we are not building a web application/api (basically non windows native application), we are free to use any kind of url. It doesn’t need to be a real end point but should follow a proper URL pattern. Here is how I have created my App Registration. Btw, you have to keep a note of this URL – we need it while working on the console application.

Create new App registration - Click on the Create at the bottom of the page which should show you a new line item in the App registrations.Clicking on the App will show you the properties and Application ID (Also known as Client Id) of the Application. Make a note of it as this is one of the key take away for building the console app.

Client ID of the Application in Azure AD - Now that we have the Application registered, We have to grant permission to this application to access our CRM services. Scroll to the right of the window and click on “Required Permissions” and Click on Add as shown below

Add permissions to the application - Click on Select an API > and then select the Dynamics CRM Online API from the list. Click Select

Select Dynamics CRM API - Under the Select Permissions, Select the “Access CRM Online as organization users” and click on Select. With this, we are officially allowing our app to communicate with our CRM as a specific user as mentioned in Console app

Delegate CRM Online permission as logged in user. - Click on Done to finish the process of granting permissions and now you should be able to see that the app is having permissions to Access CRM online
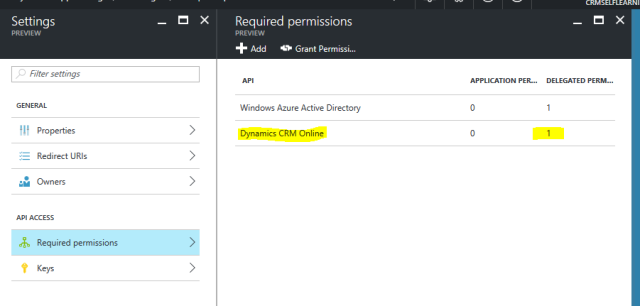
Dynamics CRM Online Permissions granted for the App
With this we are done with the App Registration part of it. Now let’s go for the Console application.
Build Console Application
- Start the Visual studio and create new Console Application project (C# only please 🙂 )
- First of all add Microsoft.IdentityModel.Clients.ActiveDirectory Nuget package to the solution. If you are not familiar on how to use Nuget, check out here
- Declare the global variables which holds AuthenticationContext, token, redirecturl and client id as shown below
/// <summary>
/// Holds the Authentication context based on the Authentication URL
/// </summary>
static AuthenticationContext authContext;

/// <summary>
/// Holds the actual authentication token once after successful authentication
/// </summary>
static AuthenticationResult authToken;

/// <summary>
/// This is the API data url which we will be using to automatically get the
///  a) Resource URL - nothing but the CRM url
///  b) Authority URL - the Microsoft Azure URL related to our organization on to which we actually authenticate against
/// </summary>
static string apiUrl = "https://ansrikanth1.crm8.dynamics.com/api/data";

/// <summary>
/// Client ID or Application ID of the App registration in Azure
/// </summary>
static string clientId = "7d2f2ceb-01f9-4375-923d-39c2e134ead2";


/// <summary>
/// The Redirect URL which we defined during the App Registration
/// </summary>
static string redirectUrl = "ms-console-app://SecondApp";
- Though we can always hard code Authority URL (which is actually the Azure Url related to the organization against which we have to authenticate), I like the way it is mentioned in this MSDN article where we can request the ResourceUrl from AuthenticationParmeters in runtime. This way we really don’t need to hard code the Resource & Authority URLs. Here is how we can do this
 // Get the Resource Url & Authority Url using the Api method. This is the best way to get authority URL
// for any Azure service api.
AuthenticationParameters ap = AuthenticationParameters.CreateFromResourceUrlAsync(new Uri(apiUrl)).Result;

string resourceUrl = ap.Resource;
string authorityUrl = ap.Authority;

//Generate the Authority context .. For the sake of simplicity for the post, I haven't splitted these
// in to multiple methods. Ideally, you would want to use some sort of design pattern to generate the context and store
// till the end of the program.
authContext = new AuthenticationContext(authorityUrl, false);
- Once after generating the AuthorityContext, Use AcquireTokenAsync method to request the token as shown below
try
{
//Check if we can get the authentication token w/o prompting for credentials.
//With this system will try to get the token from the cache if there is any, if it is not there then will throw error
authToken = await authContext.AcquireTokenAsync(resourceUrl, clientId, new Uri(redirectUrl), new PlatformParameters(PromptBehavior.Never));
}
catch (AdalException e)
{
if (e.ErrorCode == "user_interaction_required")
{
// We are here means, there is no cached token, So get it from the service.
// You should see a prompt for User Id & Password at this place.
authToken = await authContext.AcquireTokenAsync(resourceUrl, clientId, new Uri(redirectUrl), new PlatformParameters(PromptBehavior.Auto));
}
else
{
throw;
}
}
If you observe the code here, First we tried to get the token with out prompting for credentials. At this time, it will try to get the token from Cache. If it is not there then it will throw error with code as “User Interaction Required”, in which case we will actually call for token by making Credentials prompt auto.
- Now that we got the access token as well, the left out part is using HttpClient and access the webapi.
using (HttpClient httpClient = new HttpClient()) { httpClient.Timeout = new TimeSpan(0, 2, 0); // 2 minutes time out period. // Pass the Bearer token as part of request headers. httpClient.DefaultRequestHeaders.Authorization = new AuthenticationHeaderValue("Bearer", token); var data = await httpClient.GetAsync("https://ansrikanth1.crm8.dynamics.com/api/data/v8.2/accounts?$select=name"); if (data.StatusCode == System.Net.HttpStatusCode.OK) { // If the status code is success... then print the api output. WriteLine(await data.Content.ReadAsStringAsync()); } else { // Failed .. ??? WriteLine($"Some thing went wrong with the data retrieval. Error code : {data.StatusCode} "); } ReadLine(); } - That’s it, we are done with the required coding part as well. For your quick reference, here is the full source code of the console app.
using Microsoft.IdentityModel.Clients.ActiveDirectory;
using System;
using System.Net.Http;
using System.Net.Http.Headers;
using static System.Console;

namespace ConnectToCrmWebApi
{
class Program
{
/// <summary>
/// Holds the Authentication context based on the Authentication URL
/// </summary>
static AuthenticationContext authContext;

/// <summary>
/// Holds the actual authentication token once after successful authentication
/// </summary>
static AuthenticationResult authToken;

/// <summary>
/// This is the API data url which we will be using to automatically get the
///  a) Resource URL - nothing but the CRM url
///  b) Authority URL - the Microsoft Azure URL related to our organization on to which we actually authenticate against
/// </summary>
static string apiUrl = "https://ansrikanth1.crm8.dynamics.com/api/data";

/// <summary>
/// Client ID or Application ID of the App registration in Azure
/// </summary>
static string clientId = "7d2f2ceb-01f9-4375-923d-39c2e134ead2";


/// <summary>
/// The Redirect URL which we defined during the App Registration
/// </summary>
static string redirectUrl = "ms-console-app://SecondApp";

static void Main(string[] args)
{
GetToken();

ReadLine();
}

internal static async void GetToken()
{
try
{
// Get the Resource Url & Authority Url using the Api method. This is the best way to get authority URL
// for any Azure service api.
AuthenticationParameters ap = AuthenticationParameters.CreateFromResourceUrlAsync(new Uri(apiUrl)).Result;

string resourceUrl = ap.Resource;
string authorityUrl = ap.Authority;

//Generate the Authority context .. For the sake of simplicity for the post, I haven't splitted these
// in to multiple methods. Ideally, you would want to use some sort of design pattern to generate the context and store
// till the end of the program.
authContext = new AuthenticationContext(authorityUrl, false);

try
{
//Check if we can get the authentication token w/o prompting for credentials.
//With this system will try to get the token from the cache if there is any, if it is not there then will throw error
authToken = await authContext.AcquireTokenAsync(resourceUrl, clientId, new Uri(redirectUrl), new PlatformParameters(PromptBehavior.Never));
}
catch (AdalException e)
{
if (e.ErrorCode == "user_interaction_required")
{
// We are here means, there is no cached token, So get it from the service.
// You should see a prompt for User Id & Password at this place.
authToken = await authContext.AcquireTokenAsync(resourceUrl, clientId, new Uri(redirectUrl), new PlatformParameters(PromptBehavior.Auto));
}
else
{
throw;
}
}

WriteLine("Got the authentication token, Getting data from Webapi !!");

GetData(authToken.AccessToken);

}
catch (Exception ex)
{
WriteLine($"Some thing unexpected happened here, Please see the exception details : {ex.ToString()}");
}
}

internal static async void GetData(string token)
{
using (HttpClient httpClient = new HttpClient())
{
httpClient.Timeout = new TimeSpan(0, 2, 0);  // 2 minutes time out period.

// Pass the Bearer token as part of request headers.
httpClient.DefaultRequestHeaders.Authorization =
new AuthenticationHeaderValue("Bearer", token);


var data = await httpClient.GetAsync("https://ansrikanth1.crm8.dynamics.com/api/data/v8.2/accounts?$select=name");


if (data.StatusCode == System.Net.HttpStatusCode.OK)
{
// If the status code is success... then print the api output.
WriteLine(await data.Content.ReadAsStringAsync());
}
else
{
// Failed .. ???
WriteLine($"Some thing went wrong with the data retrieval. Error code : {data.StatusCode} ");
}
ReadLine();

}
}
}
}
Now, It’s time to run the application and see how it works. When you first run the app, it should show you the login page as shown here.

Once after providing the password, for the first time it will prompt for approving the access permissions

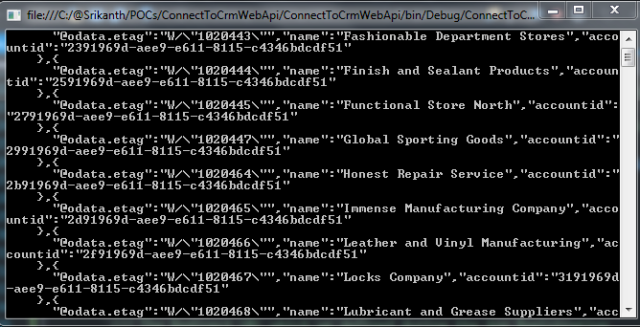
That’s it, you should be able to see your data. Note that, I have just placed the raw JSON data as it is on the console window. It’s you to decide how you want to parse it or read it further on.
Some of the points to note:
- It is always suggestible to call the Authentication generation token every time we call the WebApi. If the token is expired, the method will automatically calls for new token.
- You can use native .NET JSON serializer or you can go for Newtonsoft serializer
- We can hard code the User credentials and avoid the prompt for credentials as well. I will write it in next blog. However, “they” say it is security issue and highly suggesting to avoid this method. Have to think once again !! 🙂
Hope this would helps you in your projects, share your thoughts/comments !!
Happy coding 🙂

Very Helpful . Thanks 🙂
LikeLiked by 1 person
Pingback: Connect to Dynamics CRM WebApi from Console Application (Without Authentication popup) | CRM Ramblings
Nice article with detailed steps. Thank you
LikeLiked by 1 person
Hi Srikanth,
Thanks for this wonder post. But when I am using PlatformParameters, I am getting an error ‘PlatformParameters’ does not contain a constructor that takes 1 arguments’
LikeLike
Hi Ramakrishna
I don’t see any problem with the PlatformParameters. If you can check the constructor of the platformparameters you can see it accepts 1 argument. Can you please cross check your Microsoft.IdentityModel.Clients.ActiveDirectory version number? I’m using 3.13.9 which is showing 1 argument constructor. See this… https://ibb.co/cp4nT5
LikeLike
Thanks Srikanth for your response.
i too thought it is because of version of Microsoft.IdentityModel.Client.ActiveDirectory. Earlier it was the older version but later, I have updated it to version 3.13.9 using nugget package. Still facing the same issue.
LikeLike
Can you see from where the PlatformParameters are reffering from, it should be from Microsoft.IdentityModel.Client.ActiveDirectory. Also, Can you clean the solution and build it once just to make sure it is not referring to old dlls in any way ?
Might be helpful, if you can share some screenshots of the issue.
LikeLike
Sure Srikanth. its from Microsoft.IdentityModel.Client.ActiveDirectory. Will share the code asap
LikeLike
Hi Srikanth,
Version issue is resolved now but I am facing couples of other issues now.
1. await cannot be in catch clause (hopefully framework issue)
2. Object reference not set to an instance of an object at authContext = new AuthenticationContext(authorityUrl, false); ”
3. Moreover I would like to know the scenarios where we have to access data from crm using azure. cant we access without azure client ?
LikeLike
Which framework are you using Ramakrisna? I would suggest you, to upgrade to DotNet4.6. Switch to VS2015, C#6.0 allows using await in Catch block. FYI !!
LikeLike
Which framework are you using Ramakrisna? I would suggest you, to upgrade to DotNet4.6. Switch to VS2015, C#6.0 allows using await in Catch block. FYI !!
LikeLike
Yea I am using 4.6 but what is c# 6.0?
And one more question please what is the purpose or role of Azure here. When we can directly connect to CRM like in 2011 2013 etc what is the purpose of this?
LikeLike
C#6 released with vs2015.you need to use this authentication if you want to connect webapi. If you are using xrmtoolkit then u don’t need this as you will be passing creds directly via connectionstring
LikeLike
This is very helpful. At present we are using “Organizational Service” in our C# Web API application to access (CRUD operation) the CRM data (by using XRM SDK) and our Web API uses Newtonsoft serializer . It works fine.. but seems lot of performance problem.. Can we modify our C# Web API code using to Dynamic 365 Web API instead of XRM.SDK? Any Help is appreciated..
Thanks,
LikeLike
Yes, You can definitely use WebApi in your application, But you need to register your application as non-native application. It might be a bit tricky to authenticate though.
LikeLike
Thanks for quick response.
Actually I tried your above code using Console application but getting the below Error.
“Microsoft.IdentityModel.Clients.ActiveDirectory.AdalServiceException: The browser based authentication dialog failed to complete. Reason: The SSL certificate is invalid.”
I am Using Dynamic Online CRM UL and Valid Client ID & Redirect URL with Permission.
LikeLike
Did you ever figure it out Madu?
LikeLike
Thanks. How can we do the same with on-premise CRM and ADFS. A similar step by step will be great help.
LikeLike
that’s a great job ansrikanth………..Wainting for your articles about Dynamic crm webapi.
Thank you so much.
saikumar putta
LikeLike
Glad you liked it☺
LikeLike
Hi,
How can I authenticate Web API without prompt? In this blog, you are suggested that soon you will write the blog for the same. Can you please share the link for the same?
Than you for these detailed steps.
LikeLike
Hi, Isnt this what you are looking for https://wordpress.com/read/blogs/5900883/posts/875
LikeLike
I am really happy to glad at this blog posts which carries tons
of useful facts,
thanks for providing these kinds of data.
LikeLike