This post is literally the outcome of 2 days struggle 🙂 to achieve a two way communication b/w Dynamics CRM (I think I should say 365 now) & Azure service bus. One of the main problem I faced is lack of material that describes integration with new azure portal. Even the MSDN & SDK both are referring to old Azure portal and moreover they are describing with ACS Authentication/authorization to establish Two way communication, which I’m afraid is deprecated now as per this MSDN article. Thought it would be helpful if I blog my experiences for all the individuals over there who are struggling to get the integration work.
One last point before jumping into the actual work. I can directly start with two way communication but that might cause trouble for beginners of this topic. Henceforth, I would like start it from the basics of it and so the post will extend in to multiple parts (hoping it would be 3 to 4 parts).
You can consider this as Part 1 of the series.
To start the integration, I would expect you to be ready with a CRM organization and with Azure subscription. Trail versions of Azure & CRM are good enough to start with. Click here for Azure Trail Subscription and here for CRM Trail subscription.
For Azure trail account you might have to provide your credit card to which they will charge couple of bucks and refund immediately. After the trail period, you have to subscribe explicitly if you want to continue using it for which you have to pay(I mean, they won’t extend the subscription automatically).
Creating Service Bus in Azure
- Navigate to Azure portal with your credentials, Click [+ New] on top left corner of the portal and search for service bus.
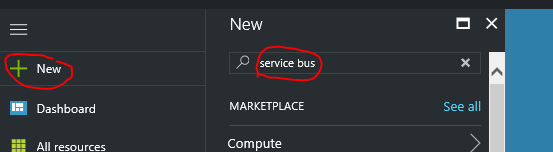
Search for Service Bus - In the resultant blade, Click on Service bus and then click on Create in next blade.
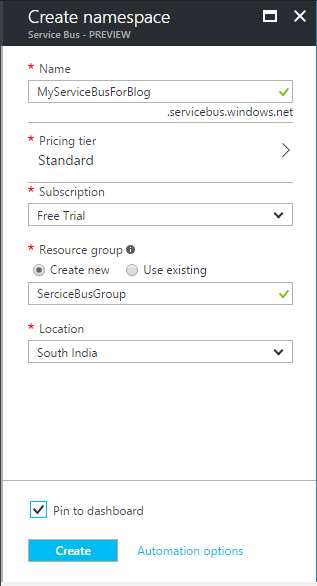
- Provide the namespace and other details as requested. Here are my details just fyr.
Create new service bus - It might take few seconds to create the service bus and get it ready for your usage. And if you selected “Pin to dashboard”, you should be able to see a tile in your Azure Dashboard. If not, then you should be able to see it in the “All resources” tile of Dashboard.
- Now that we have our Service bus ready, lets create a queue where our messages come and sit for the listener to process.
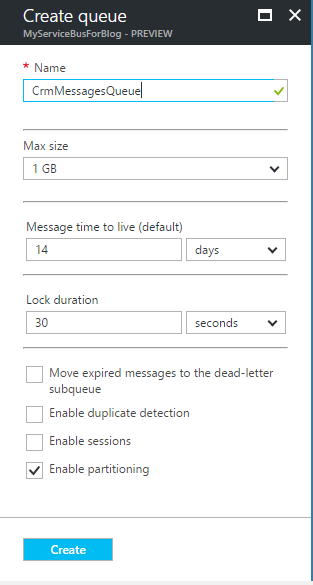
A “Sender” is the one who sends messages to the Queue, in our case it would be Dynamics CRM and a “Listener” is the one who keeps an eye on the Queue and processes it accordingly. In real world, this can be a console application or a worker role or any other application that can communicate with the Queue. - Click on the “+Queue” button in the Service bus screen (ideally when you create you should be landing on to the service bus details screen, if not click on the Service bus tile to open the service bus details) provide the queue detail. My queue details are
Create New Queue - Once after creating the Queue, Click on the Queue from the list to open the Queue details blade. We need to generate an access key (SAS Access key) for this queue so that we can provide the connection details to other applications (like CRM) to communicate. This is what also called as “Authorization”. Read more details about it over here. Click Add button to add new shared access policy as shown below.
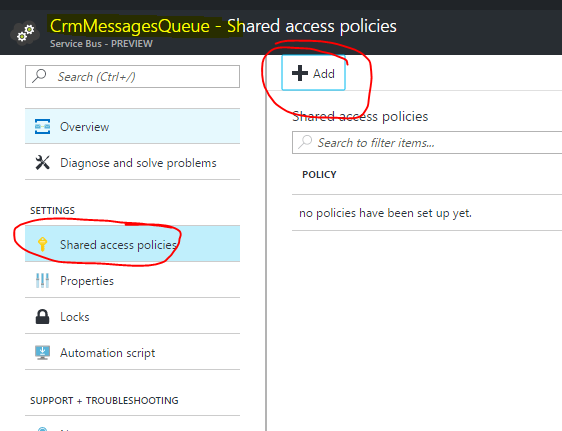
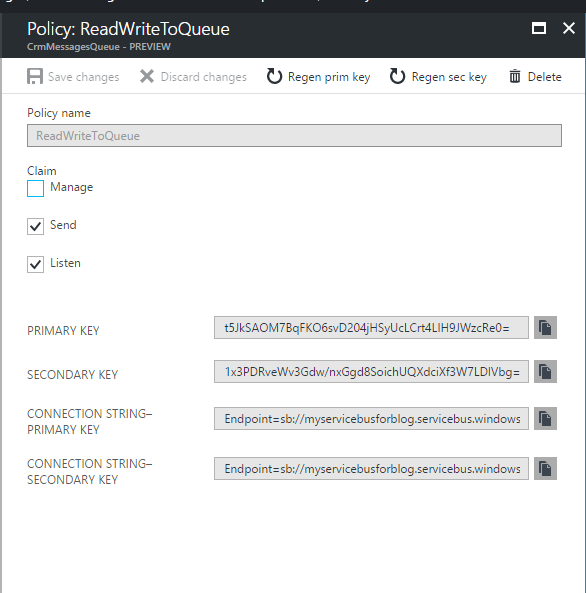
Shared access policy for Queue - Give policy name some thing like “ReadWriteToQueue” and provide only “Send” and “Listen” permissions to the queue. Note that, We won’t be giving Manage access to any one, with which they can go ahead and delete the queue as well if they want.
- Once after creating the policy, if you open the policy you should be able to see the Connection string and Primary key, Secondary key of the queue. Keep them safe with you. Any one with this key details now can send and listen your Queue. So, please be careful while sharing the details. Btw, you have the feasibility to change the key if you think your key is compromised but that attracts change in all your applications to change the key. (Don’t worry, I have regenerated my keys below :))
Primary Key and Connection string of Queue - Now, we are ready with our service bus and Queue. Let’s start the integration with CRM now first and then we will see the listener application. Open the Plugin registration tool (hoping you have already downloaded the SDK). Connect to your organization and click on New -> Service end point registration as shown below. (You can even use Ctrl+E if you are a key board player 🙂 )

New Service Endpoint registration - Select “Let’s start with the connection string from Azure service bus portal” option and enter the Primary key connection string we got in step #9. (Tip : You can click on Copy button beside the connection string to copy the full connection string in 1 click). Click Next button after pasting/entering the connection string.
- You should be able to see all the connection details (service bus name space, SAS Key name etc), Ensure the details are correct and Click Save button.

Service Endpoint registration confirmation - Register a new step like how we will create for any other plugin assembly. Notice that, you can not register a synchronous step. It should always be an asynchronous job. For now, I’ve registered it on Contact Post create (Async).

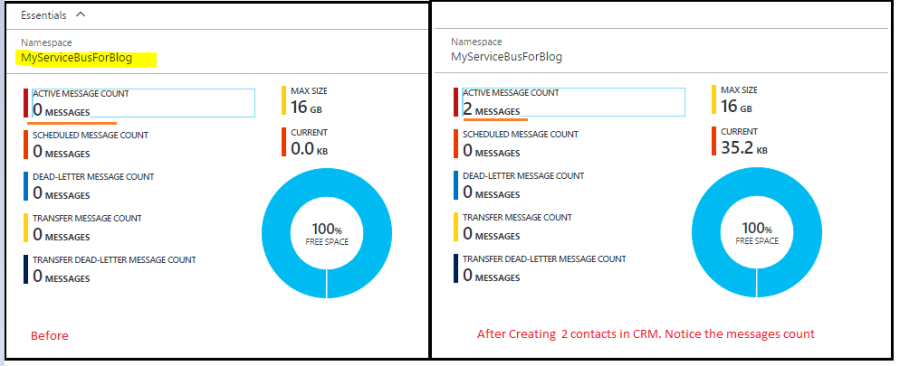
Register message against Service End point - With this, we are done with the changes required from CRM (sender) end and even from the Service bus end. The result of these steps is Whenever we create a contact record, CRM will send the full context information (Like how we get PluginExecutionContext) as a message to Azure service bus Queue which we defined. Let’s quickly test how it is working by creating a contact. Here is the result I found when I created a contact in My CRM organization.

Queue Messages in Azure service bus - Now that we are done with the Sender part of the process, lets quickly create a simple console application to see what is the messages we got. Create a new Console application project, Add “WindowsAzure.ServiceBus”, CRM Libraries Nuget reference to get the libraries related to Azure service bus and CRM.
- Here is the code that you can use as it is to get the data in the message and it is pretty much self explanatory.
string connectionString = @"Endpoint=sb://myservicebusforblog.servicebus.windows.net/;SharedAccessKeyName=ReadWriteToQueue;SharedAccessKey=cF58OjpNX786n8G9oASN0YouxsZbpZkkxm7FQ3dJgFg=;EntityPath=crmmessagesqueue"; var queueClient = QueueClient.CreateFromConnectionString(connectionString, ReceiveMode.PeekLock); queueClient.OnMessage(message => { var context = message.GetBody<RemoteExecutionContext>(); WriteLine($"Primar Entity Name: {context.PrimaryEntityName}"); WriteLine($"Primary Entity Id: {context.PrimaryEntityId}"); var entity = context.InputParameters["Target"] as Entity; foreach (var attribute in entity.Attributes) { var value = attribute.Value; var convertedValue = (value is EntityReference || value is OptionSetValue) && entity.FormattedValues.Contains(attribute.Key) ? entity.FormattedValues[attribute.Key] : value; WriteLine($"{attribute.Key} --> {convertedValue}"); } }); ReadLine(); - Let’s quickly walkthrough the code.
- The Connection string is obviously our Queue’s Primary connection string which you can get from the Service Bus >> Queues >> Your Queue Name >> Shared Access Policies >> Your Policy >> Connection String – Primary key.
- QueueClient is one of the AzureServiceBus classes which can help you in listening the messages that are coming to the specific queue (if you observed the connection string, the end of the connection string you can see the Queue which we are attaching this listener).
- The OnMessage of Queue Client is like an event driven method which will trigger the call back function whenever there is any incoming message to the attached queue.
- Inside the call back function it is just some random code I used to display the context details. You can see, we will be getting full context of the primary entity like how we will get in Plugin. Notice the usage of RemoteExecutionContext, this is the object that we will get from the service. You should be replacing this with your relevant code. Following is the o/p of my console application for your quick reference.
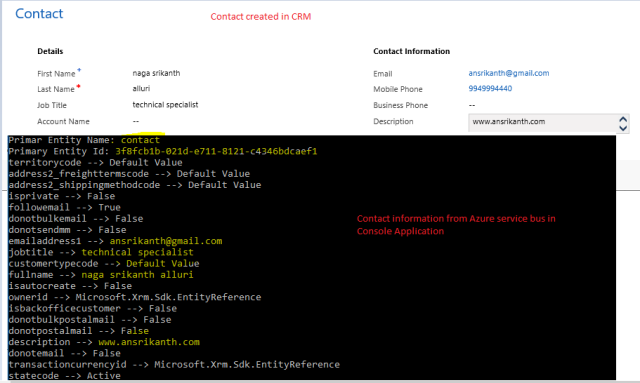
Output from Azure Service bus Queue -
Note: You can use Shared variables as well, if you want to pass the information of any other related entities.
-
Also, the main advantage of using Queueing & service bus mechanism is to decouple the logic. So, don’t try to access the CRM from your Console application again, rather use the shared variables or custom classes to pass the required information from CRM to Queue.
With this we are done with the first part of the integration with Azure service bus & CRM. This is what the OOB and pretty straight forward integration which can fit in many of the default scenarios.
Hope, you enjoyed the post. I’ll try to quickly blog the next posts as well, where I’ll be discussing about Twoway integration with CRM and using worker role to host the service in side the Azure.

Thanks for putting it all together, very useful. Looking forward to your next post 🙂
LikeLike
Thanks Harendra, Working hard to finish of the next post asap 🙂 , locked up with loads of other technologies these days !!
LikeLike
Pingback: Two way communication between CRM and Azure Service bus | CRM Ramblings
Hi Srikanth,
This is a great post. Explanation was upto the detail.
Keep going with the posts on newer technologies.
You have always been an inspiration in the learning space.
LikeLike
great work, everything i needed thank you
LikeLike
Hi Shrikanth,
I want to send json to service bus queue from plugin.
Like whenever I update one entity I am creating Json string and that will be passed to queue through plugin.
Please help me.
Regards,
Prachi
LikeLike
Pingback: Two way communication between CRM and Azure Service bus – Part 2 – power platform