
I’m sure this post will answer 2 questions. a) How to call Custom actions from WebAPI b) How to reduce the “chatting” b/w client n’ server.
When it comes to #b, reducing chatting b/w client n’ server – Imagine you have a custom web resource from which you are creating/updating multiple records in to CRM, In this scenario generally many of us will simply loop through the records and “POST” the entity via WebAPI like this

Just imagine how many service calls we might be doing from client to server overall for all agents in a day and in the life time of the application? Huuggeee.. isn’t it ?? How it would be if we can convert all these per agent/per transaction requests in to one “custom action” some thing like

You can see a clear advantage in terms of reduced service calls b/w client – server and so the obvious performance improvement.
Btw, I found the above illustrations as part of my training happend couple of weeks back and thought it would be nice to explain using the same. Thanks to David who is my trainer 🙂
So, In this post we will see how we can achieve this. As part of this process, we will be first creating a Custom Action which can accept the set of Entities (EntityCollection), A Plugin on top of this Custom Action which actually fires ExecuteMultiple Request and Finally, a WebAPI call to this Custom action from Client side scripting.
Step 1: Create the Process
Let’s create a new Custom action which will take EntityCollection as Input parameters with the following details (For those who are new to Actions:- you have to navigate to Settings >> Process >> New Process to create new action )
| Field | Value | Remarks |
| Process Name | Execute Multiple Operations | Any meaningful name |
| Category | Action | |
| Entity | None | None because we are not tying it up with any Entity |
| Type | New Blank Process |
Note that, we have set the Entity to None. With this the action will become unbound action meaning we can execute the action irrespective of entity.

Create new Input argument as shown below.
| Field | Value | Remarks |
| Name | Entities | Any meaningful name |
| Type | EntityCollection | |
| Entity | ||
| Required | TRUE | |
| Description | Some description | Not mandatory, but if you are placing any – please go through this bug once. |

Nothing else to do in the action. Just Save it and “Activate” the Action.
Step 2: Create Plugin on top of the Action
Note: You must be following different patterns for creating plugins in your project. But in my case, I’m just going through the Dynamics CRM Plugin Project for the sake of simplicity.
- Create new Plugin project as shown below
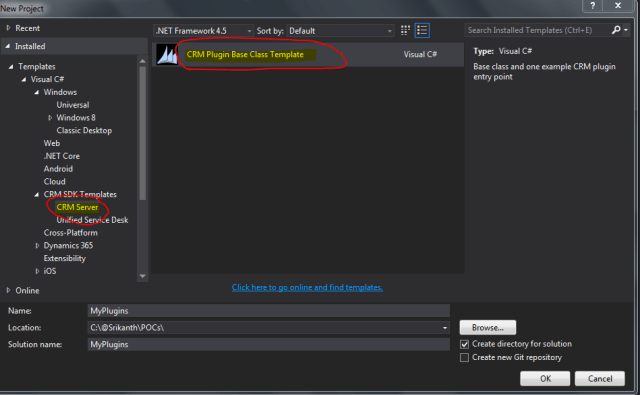
New Plugin Project from CRM Plugin Base Class Template - Build the project first w/o any change in the code, which will automatically restores all the required libraries from Nuget package.
- After successful build, replace the Override ExecuteCrmPlugin with the following code.
 protected override void ExecuteCrmPlugin(LocalPluginContext localContext)
{
if (localContext == null)
{
throw new ArgumentNullException("localContext");
}

// Get the input parameters from the Plugin Execution Context
var entitiesToCreate = localContext.PluginExecutionContext.InputParameters["Entities"] as EntityCollection;

// Ensure the Entities collection is not null, If so - Throw Exception.
if (entitiesToCreate == null)
throw new ArgumentNullException("Entities",new Exception("Entities Collection not found to create"));

// Initiate ExecuteMultiple Request to create all records in one call.
ExecuteMultipleRequest emRequest = new ExecuteMultipleRequest()
{
// Not interested to create any record even if One failed - This is my choice. You can decide how you want to go ahead 🙂
Settings = new ExecuteMultipleSettings() { ContinueOnError = false, ReturnResponses = false },
Requests = new OrganizationRequestCollection()
};

// Loop through all the Input Entities and create new CreateRequest object.
foreach (var ent in entitiesToCreate.Entities)
{
CreateRequest createRequest = new CreateRequest() { Target = ent };

// Push the CreateRequest object in to ExecuteMultipleRequest Requests paramter.
emRequest.Requests.Add(createRequest);
}


// Execute the request using Organization service's Execute Method
localContext.OrganizationService.Execute(emRequest);


}
Notice how we are grabbing the Entity collection from Inputparameters collection of PluginExecutionContext. Once after getting Entities, loop through them and add them to the ExecuteMultipleRequest object to execute with in a single service call.
- Build the project and Sign the assembly (this is mandatory step for me as I’m going to use this plugin in my Online instance, It may not be mandatory for you if you are using OnPrem). Click on the Project Properties >> Signing >> Sing the Assembly >> New

Sign the Plugin Assembly. - Rebuild the project once and register the plugin assembly using Plugin Registration tool.

Register new Plugin - Register the new step with following information (You can leave the all other options as it is).
Field Value Remarks Message new_ExecuteMultipleOperations Or whatever the name you have choosed in Step1 Primary Entity None Secondary Entity None Event PipeLine Post It is fine even if you want to go ahead with Pre execution, there is no difference of it as we don’t have any steps registered in the action it self Execution Mode Synchronous 
Register step against Custom action That’s it we are done with Plugin as well. The left out part is the Web resource to call the action by using WebAPI from Javascript.
Step3: WebAPI call to the custom action from Javascript
Note: As an example, I’m showing how we can create 10 “Task” records against a account. I have created it as helper method so that we can use it wherever we want (ie in HTML Web resource, as Ribbon button method etc).
- Create a new java script web resource as a Helper file as shown below

JS Helper Web resource - Paste the following Javascript code in to Webresource
// Get the Client URL
var clientUrl = Xrm.Page.context.getClientUrl();
var CONST_API_VER = "/api/data/v8.2/";


//Create new Tasks
function CreateTasks() {

// Get new Sample data.
var data = SampleData();

var customActionName = "new_ExecuteMultipleOperations";

// Prepare Service URL.
var serviceUrl = clientUrl + CONST_API_VER + customActionName;

// Prepare Request object which accepts JSON data and returns JSON information.
var req = new XMLHttpRequest();
req.open("POST", serviceUrl, false);
req.setRequestHeader("Accept", "application/json");
req.setRequestHeader("Content-Type", "application/json; charset=utf-8");
req.setRequestHeader("OData-MaxVersion", "4.0");
req.setRequestHeader("OData-Version", "4.0");
req.send(JSON.stringify(data));

// Check the request status and show the error message if any.
if (req.status == 204) {
alert("Created tasks !!")
} else {
var error = JSON.parse(req.response).error;
alert(error.message);
}


}


// Create Sample data for 10 tasks, which associate with "a" account.
function SampleData()
{
var data = {};
var collection = [];
for (var i = 0; i < 10; i++) {
var ent = {};
ent["@odata.type"] = "Microsoft.Dynamics.CRM.task";
ent["subject"] = "test " + i;
ent["regardingobjectid_account@odata.bind"] = "/accounts(475B158C-541C-E511-80D3-3863BB347BA8)";
collection.push(ent);
}
data.Entities = collection;

return data;
}
Notice how we have called the Custom Action in CreateTasks method. This is how we should be calling the “Unbound” actions. If the action is bound to an Entity in other words “Bound action”, then we are supposed to use the fully qualified name of that action (which we can see in my next blog post).
ent[“regardingobjectid_account@odata.bind”] = “/accounts(475B158C-541C-E511-80D3-3863BB347BA8)”
Check the usage of Regarding Object Id, If we have to bind the Regading object to a contact then it should be ent[“regardingobjectid_contact@odata.bind”] = “/contacts(<<Contact guid>>)”.
That’s it, we are done with our Web resource as well.
The left out part is, how you are planning to use the Helper method. You can include this helper method as part of some ribbon button as shown here or you can create a nice HTML window and use it as part of your HTML Javascript code.
For the sake of quick test, I just used IE Developer tools and called this CreateTasks method from console and here is the result for you … 🙂

And the best part of it is, as you can see it is just One service call from Client to Server instead of 10 calls.
Hope this helps in your projects, Share your feedback via comments.
Happy coding !!

Excellent very informative thanks for sharing @srikanth
LikeLiked by 1 person
Pingback: share – Will
Thanks for sharing. It is very helpful.
LikeLiked by 1 person
why you have used the plugin.You are creating the task from javascript right.Plugin is only for showing executive multiple request
LikeLike
Hi Srikanth, In the above example if I were to use POSTMAN and make a client web api call, what would the JSON payload look like? When I tried the below, I get it throws me a bad request with error message “The annotation ‘odata.type’ was found. This annotation is either not recognized or not expected at the current position.”
“@odata.type”: “Microsoft.Dynamics.CRM.task”,
“regardingobjectid_account@odata.bind”: “/accounts(ea266e06-0fb5-e711-8117-5065f38b4251)”,
“subject”: “test-1”}
LikeLike
{
“Entities”: [
{
“@odata.type”: “Microsoft.Dynamics.CRM.task”,
“regardingobjectid_account@odata.bind”: “/accounts(ea266e06-0fb5-e711-8117-5065f38b4251)”,
“subject”: “test-1”
},
{
“@odata.type”: “Microsoft.Dynamics.CRM.task”,
“regardingobjectid_account@odata.bind”: “/accounts(ea266e06-0fb5-e711-8117-5065f38b4251)”,
“subject”: “test-2”
},
{
“@odata.type”: “Microsoft.Dynamics.CRM.task”,
“regardingobjectid_account@odata.bind”: “/accounts(ea266e06-0fb5-e711-8117-5065f38b4251)”,
“subject”: “test-3”
}
]
}
The above tested successfully for me. Thank you, Ravi.
LikeLike
Thaanks great blog post
LikeLike