This is the next level of my previous post on Azure service bus integration with CRM. If you haven’t gone through it already, I would highly recommend you to go through it first over here as whatever we are going to do here in this post is kind of an extension to my previous one.
So, in the last post, we saw how we can pass the CRM entity information to ASB (Azure Service Bus) whenever it got created/updated/any other plugin actions happened. And you must have noticed by now that it would be an asynchronous job for us, meaning CRM would be in ‘fire and forget’ mode. All it knows is it has dropped a ‘Message’ in a Queue, it doesn’t know when it got picked up and when it got processed and who picked it up etc. In some cases this might be the exact behavior we are looking for but not in all cases. There might be a scenario where we need information immediately from the service bus, for ex: A quote engine which can calculate the quote value based on a lot of considerations; we can’t really use fire and forget mechanism in such scenarios. That is where the two-way communication between CRM and ASB is helpful. We will see how we will establish a communication in this post.
W/o any further delay lets jump into actions.
Azure Configurations
1. Hoping you have active azure subscription (or at least the trail version which we have created in the previous post), Navigate into your azure portal
2. This time, we are not dependent on a Queue rather we will be using a Virtual path which can be used by the Quote engine and CRM will keep sending messages to this virtual path.
Btw, I’m considering the above mentioned scenario to demo the post
3. From the All Resources menu item, Open the Service bus which we created in the last post. In my case, it is “MyServiceBusForBlog”. (This is why I have asked to follow the previous post 🙂 )
4. Click on Shared Access Policies under Settings. You should be able to see in the resultant blade a Master access key in policies list. This is the main key with which anyone can control the azure service bus programmatically. So, Keep it safe :). Click on Add button to create a new Shared access Policy.

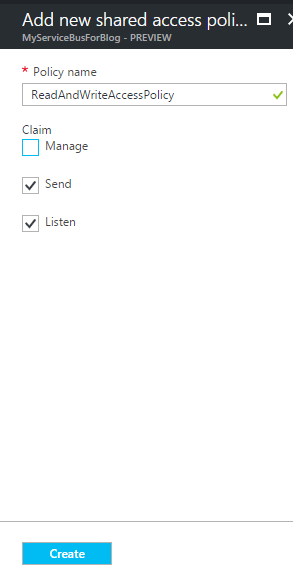
5. Give a meaningful name (I’ve chosen ReadAndWriteAccessPolicy) for the policy and give ‘Send’ and ‘Listen’ access as shown below and click Create.

6. The blade will close automatically and in few seconds you should be able to see a new Policy got created for this ASB.
7. If you can click on the policy, you should be able to see a couple of Keys (primary key and secondary key) and connections strings associated with these keys. Keep a note of these, we will be using them in the subsequent steps.
Console Application (Quote Engine) to host the Azure Service
8. Now that we have completed required ASB configuration, lets quickly create a console application which will connect to the azure and hosts/listens to a virtual path in our ASB. Create a console application and add following NuGet References (self-explanatory, Note: IdentityModel reference will automatically come if you add SDK assemblies).

9. Now, We have to use ITwoWayServiceEndpointPlugin interface to establish a 2-way communication with CRM. FYI, this is part of SDK Libraries. Create a new class file with name “QuoteEngineListener” and implement the interface as shown below.
public class QuoteEngine : ITwoWayServiceEndpointPlugin

{

public string Execute(RemoteExecutionContext executionContext)

{

/// This Execute method will execute automatically whenever a message has been passed

/// to the service bus.

/// In realworld scenarios this would become a backend worker role and will call the

/// third party services to get the details.

/// We can use the executionContext Object to get the details of the CRM object

var entityName = executionContext.PrimaryEntityName;

WriteLine($"Received message for entity {entityName} with Id {executionContext.PrimaryEntityId}");

WriteLine("Generating quote value....");

if (entityName != "quote")

return "0";

var quoteValue = new Random().Next(1000, 10000);

WriteLine($"Genertated quote value as {quoteValue}");

return quoteValue.ToString();

}

}
Notice the Execute method which returns a string value. This would be the return value that we will be catching in our plugin (explained further below). The Execute method will automatically trigger whenever there is a message pumped to ASB.
And the RemoteExecutionContext is a wrapper class on top of the regular PluginExecutionContext – ie. You should be able to get everything what your plugin execution context contains (like Target entity, Pre & Post Images, shared variables etc etc).
In my code above, I have shown how to get the primary entity name as an example. The method will return a random number as my QuoteValue. Keep in mind it should be a string output only. You have to serialize your complex objects if required.
10. Now under the main method, we will be hosting it as a service inside the azure. Here is how my Main method looks like with detailed explanation.
static void Main(string[] args)
{
try
{
// The access policy we created in previous steps and the Primary key
string sharedAccessKeyName = "ReadAndWriteAccessPolicy";
string sharedAccessKey = @"VRyr0+Msdv0HgoWNSnBZyNxtAZw/Uq55RSPTy96FDOM=";

// This is the standard Azure service bus end point
// MyPath at the end of the URL is the virtual path which is the entry point for the messages
// https://<<ServiceBusName>>.servicebus.windows.net/<<PathName>>
string serviceBusEndpoint = "https://myservicebusforblog.servicebus.windows.net/MyPath";

// QuoteEngine is the class which is inherited from ITwoWayServiceEndpointPlugin
var serviceHost = new ServiceHost(typeof(QuoteEngine));

// Generate the token provider for ASB using Polilcy name and Primary key
var tokenProvider = TokenProvider.CreateSharedAccessSignatureTokenProvider(sharedAccessKeyName, sharedAccessKey);
var transportClient = new TransportClientEndpointBehavior(tokenProvider);

// Add WS2007HttpRelayBinding type end point
serviceHost.AddServiceEndpoint(typeof(ITwoWayServiceEndpointPlugin), new WS2007HttpRelayBinding(), serviceBusEndpoint)
.Behaviors.Add(transportClient);

// Start the service
serviceHost.Open();

Console.WriteLine("listening .. ");

Console.ReadLine();
}
catch (Exception ex)
{
Console.WriteLine(ex.ToString());
throw;
}
}
}
The code is pretty much self-explanatory. Let’s have a quick walk through. The first 2 lines are the Shared access policy and primary key we got in step #7. The service bus endpoint is a combination of Service bus name and the virtual path where the service will keep listening for messages. This is how the end point looks like https://<>.servicebus.windows.net/<>
After that, we will be hosting the service with WS2007HttpRelayBiding and start the service.
Make sure to update your relavent Primary key name and policy name and the service bus name in the above code.
11. That’s it, we are done with the hosting part of it. Start the console application and leave it running.
Note: It is mandatory for the service to keep open and in listening state.
Register the Service Endpoint
12. Now, Open the Plugin registration tool and connect to your organization.
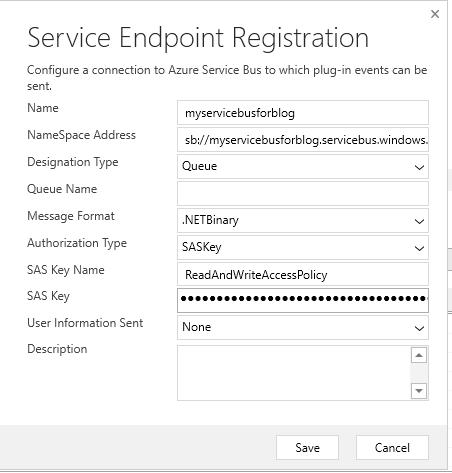
13. Click Ctrl+E to register the service point and provide the connection string which we got in Step#7 (For more clear steps on this, refer my previous post). This is how the endpoint registration window should look like https://<>.servicebus.windows.net/<>.

14. Now following steps are crucial and I would suggest to follow them in the same order. If you missed the order at any stage and feel like you messed it up, I would recommend to start again from Step #13.
a. Change Designation Type to TwoWay
b. Change the NameSpace address from sb:// to https://
c. Add the “MyPath” virtual path to the end of the Namespace. End of the step your NameSpace would be the one which we have used in the Console Application’s “serviceBusEndpoint”.
d. Mention the Path as “MyPath”. This how the window should look like at the end of this step

15. Hit save, will take a couple of seconds to create the end point. Once after creating the end point, Click on the properties window and make a note of the Endpoint Id as shown below.

Create a New Plugin project to send the information to ASB
16. Create a new Plugin project (basically a class library project) and do the regular stuff (like adding required reference libraries, IPlugin etc), hoping everyone is well aware of how to create a plugin, I’m not going to stress on this area.
17. Add a constructor, which can accept unsecure config as shown below. Note: My Plugin project name and class name is AzureTwowayCommunication
// Class level global variable to hold the Service end point ID.
private Guid serviceEndPointId;

///
<summary>
/// Standard Plugin Constructor, accepts Unsecure and secure configurations.
/// </summary>

/// <param name="unsecureConfig"></param>
/// <param name="secureConfig"></param>
public AzureTwowayCommunication(string unsecureConfig = "", string secureConfig = "")
{
// for the sake of simplicity, I'm using unsecure conifiguration of plugins
// to get the service end point id.
// you might want to use any other "configurable" mechanism to store this id.
if (string.IsNullOrEmpty(unsecureConfig))
throw new InvalidPluginExecutionException("Please provide Service Endpoint ID in unsecure configurations");

if (!Guid.TryParse(unsecureConfig, out serviceEndPointId))
throw new InvalidPluginExecutionException("Please provide Service Endpoint ID in unsecure configurations");
}
Again self-explanatory constructor; nothing fancy. Accepting unsecure and secure configurations. So, in the unsecure configurations, we are going to pass the entity reference of the service endpoint which we created in previous steps. However, it is up to you how you will get this entity reference id. For the sake of simplicity, I have placed it in the unsecure configurations.
So, in the unsecure configurations we are going to pass the entity reference of the service end point which we created in previous steps. However, it is up to you how you will get this entity reference id. For the sake of simplicity I have placed it in the unsecure configurations.
18. Now that we got the service endpoint id, Let’s create the service and call the execute method as shown below.
public void Execute(IServiceProvider serviceProvider)
{
// Retrieve the execution context.
IPluginExecutionContext context = (IPluginExecutionContext)serviceProvider.GetService(typeof(IPluginExecutionContext));

var entity = context.InputParameters["Target"] as Entity;

IServiceEndpointNotificationService cloudService = (IServiceEndpointNotificationService)serviceProvider.GetService(typeof(IServiceEndpointNotificationService));
if (cloudService == null)
throw new InvalidPluginExecutionException("Failed to retrieve the service bus service.");

try
{
string response = cloudService.Execute(new EntityReference("serviceendpoint", serviceEndPointId), context);

// set the value wherever needed
entity.Attributes.Add("description", $"Quote value from the service is {response}");

}
catch
{
throw;
}

}
The IServiceEndpointNotificationService will provide the Service Endpoint, by passing the service endpoint entity reference to it, we are actually telling the system that we want to access the Two-way end point service registered in the organization.
Once after getting the response, it is up to you where/how you want to use it. For now, I have placed it inside the Description field.
19. Build it and register the plugin. I have registered it against the Quote Pre-create as shown below.

20. The next key step is adding the service endpoint id which we got in step #15 to unsecure configurations. Here is my unsecure config.
21. That’s it, Click ok and create a new quote. Just before creating, please make sure the following points once again.
a. The console application which hosts the service should be up and running.
b. As per MS documentation, Once after hosting the service we should wait at least 30 seconds for the service to be ready to accept messages. This is very critical point.
c. The Unsecure config of the plugin should have the enterprise ID only as shown in previous screen shots. If you have any other, then carefully handle the end point id in the code.
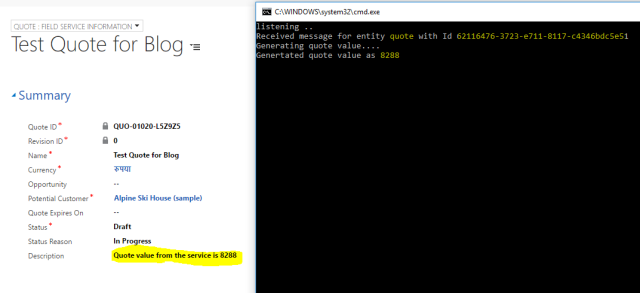
22. Here is how my quote and console application are looking like when I created a new quote.

I hope you enjoyed the post, though it is looking as a very big and complicated post, but once if you configure it then you will definitely feel it is pretty straight forward implementation.
In next post, I’ll try to blog about how we can move this console application from the local machine to cloud as a background worker role so that we can ensure it is always up and running.
Happy coding !!


Really useful, thank you very much!
Respect.
Francesco
LikeLike
Hi, i keep ending with a ‘The HTTP request is unauthorized with client authentication scheme ‘Anonymous’. The authentication header received from the server was ”.’ – Did you have this problem and did you manage to fix it? I’ve been able to drop a message on an endpoint configured as a Queue but as soon as i set it to Two-Way i run into issues.
LikeLike
Hi, never faced any such issue. Are you sure you are doing step 13 as it is? That’s where I faced some problems initially and so stressed on that point in the post. Also, you need to wait at least 30 seconds after hosting your service in AZURE then only your service would be available to use.
LikeLike
Hi – i think the issue stems from the set up in Azure – your previous post is all about setting up a Queue so it’s a little bit confusing to then do a jump this post expecting it to work. I ended up using a relay which you haven’t specified explicitly in this document.
LikeLike
Hi, I was ending with the same error on ‘The HTTP request is unauthorized with client authentication scheme ‘Anonymous’. The authentication header received from the server was ”.’ Did you fixed it?
LikeLike
Fixed the issue, the reason was name of virtual path. I specified the queue name as the name, so it didn’t work. Change it to another name could solve it. 🙂
LikeLike
did you ever do volume 3? the non-console worker?
LikeLike
Reblogged this on Nishant Rana's Weblog.
LikeLike
Pingback: Two way communication between CRM and Azure Service bus - 365 Community