
POST UPDATE : One of my friends from Microsoft suggested to use Minutes update instead of Seconds as Updating UI via actions for every seconds might cause some performance issues. Henceforth, it is suggested to use this approach only Minute wise update. Please drop a comment incase of any doubts.
First of All – Happy new year to all readers. 2017 has been a fantastic year to me – started my blog, got a new role (with my old buddies) in one of my fav companies and most importantly, Adhi, my cutie pie filled lights with his smiles in our life. I wish the colors continue in 2018 as well for me and to all of you as well:)
Coming to the actual topic of the day – “Display a Timer that shows the active time in a Tab”. One of the most common requirements I see in general is, how much time my agent is working on a case. It may not be really possible to calculate 100% accurate time, but If we consider – “the amount of time he was actively looking into the case itself is the working time”, then this solution would definitely work for you.
Note: This is one simple implementation for this problem, there might be a lot of other ways. Also, for the demo purpose, The post implements the timer on Debugger tab instead of case tab, It’s your duty now to implement it for Case tab :). Remember – “Practice makes perfect” 😉
One last word before jumping into the actual solution, this solution takes the “idea” from a post that has been already implemented by @Neil in this ping-pong post. You might be interested to take a look at it once for some basic understanding on action calls/events etc.
Here are the steps at a glance.
1. Create action call to start/stop timer
2. Create action call to trigger ‘seconds counter’ after one second using ExecuteTimeOut action
3. Create action call to increment ‘seconds counter’ using CopyToContext action
4. Join both these as sub action calls to make ping-pong action calls.
5. Attach the action call to SelectedAppChanged event.
Step#1: Create action call to start/stop the timer, if the active application is debugger then set StopTimer to 0 in context else set to 1.
| Name | Value | Description |
| Name | Set stoptimer flag | Some meaningful name |
| Order | 5 | |
| Hosted Control | CRM Global Manager | The Global Manager Hosted control |
| Action | CopyToContext | |
| Data | StopTimer=$Expression(“[[Selection]+]”==”Debugger”?0:1) | If Selection is Debugger then 0 else 1. The selection comes from SelectedAppChanged event in step#5 |
Step#2: Create action call with following details. The ExecuteOnTimeOut action will wait for the given milliseconds and executes it’s sub action calls. Read more here.
| Name | Value | Description |
| Name | Increment timer after 1 sec | Some meaningful name |
| Order | 10 | |
| Hosted Control | CRM Global Manager | The Global Manager Hosted control |
| Action | ExecuteOnTimeout | This action may not exist for the global manager. Feel free to create one for Global Manger if it is not there |
| Data | milliseconds=1000 | I want my timer to trigger for every second and so 1000 milliseconds. If you want it for a minute – your obvious number would be 60,000 |
| Condition | “[[$context.StopTimer]+]”==”0” | Make sure the StopTimer flag is set to 0 (false). |
Step#3: Create action call for ‘seconds counter’ with the following details. Basically, we will be maintaining an incremental counter in a context variable using CopyToContext action.
| Name | Value | Description |
| Name | Increment the case time counter | Some meaningful name |
| Order | 10 | |
| Hosted Control | CRM Global Manager | The Global Manager Hosted control |
| Action | CopyToContext | |
| Data | debuggertime=$Expression(“[[$Context.debuggertime]+]”==””?1:parseInt(“[[$Context.debuggertime]+]”)+1) debuggertimeinHr=$Expression(new Date($Expression(“[[$Context.debuggertime]+]”==””?1:parseInt(“[[$Context.debuggertime]+]”)+1) * 1000).toUTCString().substr(16, 8)) |
Checking if context has debuggertime replacement param, If there increment by 1, If not make it as 1. This is basically to count the number of seconds you are in the debugger tab. The second line – debuggertimeinHr is just to display the seconds into hh:mm:ss with a simple hack provided over here. |
| Condition | “[[$context.StopTimer]+]”==”0” | Make sure the StopTimer flag is set to 0 (false). |
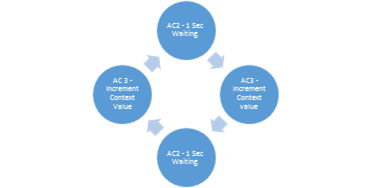
Step#4: Join both the action calls – AC2 (Action call 2 created in step#2) should have AC3 (Action call 3 created in Step#3) and then AC3 should have AC2 as sub action call. In that way, Whenever AC2 triggers, it waits for 1 sec and calls AC3 => Which then simply increments my counter in context and calls AC2 again. The loop will continue till the time my condition (StopTimer==0) fails on AC3. Here is a quick diagram that might help in understanding this cycle.
Let’s go and add as sub action call to one another. This is how my sub action calls are looking like.
 |
 |
Now that our action calls are ready to use, Let’s go to the final step.
Step#5: Attach action calls to event SelectedAppChanged – an event which tells what is the active tab whenever the tab changed. More info about this event is given by Neil in this post.
Navigate to your Panel Layout hosted control => events => SelectedAppChanged, Add “Set stoptimer flag” & “Increment timer after 1 sec” action calls as shown below.

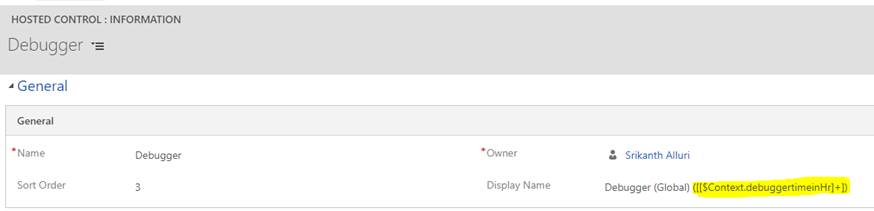
That’s it. We are all most done. The leftover part is, displaying the timer. I have modified my Debugger control’s display name as shown below to cater a time display. DONE !! Close & Re-open your USD, Start debugger – Shift focus to Debugger and see.
The final outcome should look like the one on this post title :). Enjoy !!
