
Hello Friends, This is mainly aimed for the beginners of USD “Developers” ( I mean the Coders 🙂 ). In this post I will try to show you all the detailed steps involved (starting from installation of project templates till deployment) and would like to take it up with a scenario.
Scenario/Use Case : Agent should have the option to create a new Contact History (custom entity) record with an option to place some comments. The added complexity is, Only Admin users will have permissions to create records, all other will have only read-only permissions on this custom entity.
I’m thinking of making it into multiple posts so that I can easily modularise the steps which can help in multiple other scenarios. Let me see how many posts it will come.
First we will see how do we install the Visual Studio Project templates for CRM/USD.
It is not mandatory to install the project templates. But I would highly prefer to do so as you will be getting all the required assemblies loaded for the project along with a sample control and sample code.
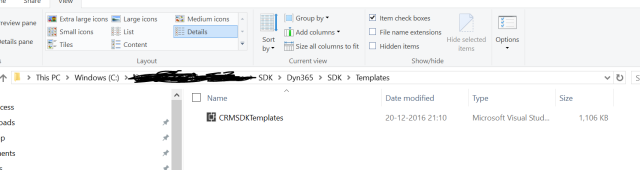
If you haven’t downloaded the latest Dynamics 365 SDK, please download it from HERE. If you extract the setup file, you should be able to see the Visual studio project template extension file @ /SDK/Templates as shown in below example.
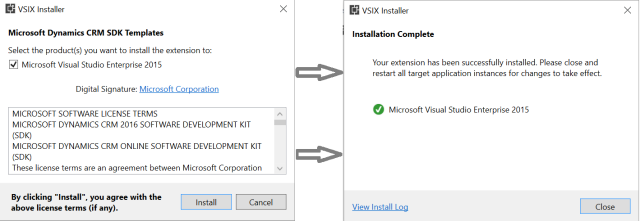
Double click on the file to start the simple installation which just lasts in 2 clicks and in less than a minute. Here is a quick screenshot of the beginning and ending screen.
Once after completing the installation If you open Visual studio new Project then you should be able to see a new project template under header CRM SDK Templates as shown below.
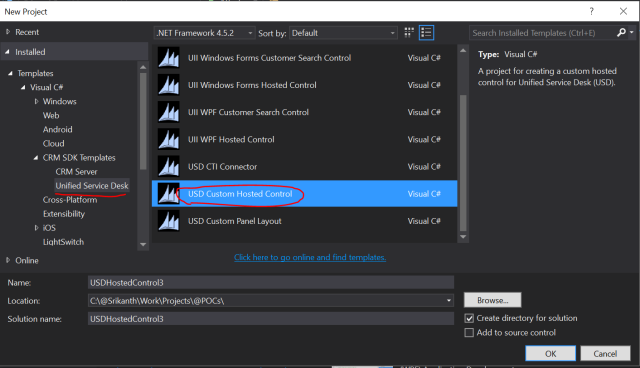
You can see there are good amount of project templates under Unified Service Desk node (viz. USD CTI Connector, Custom Hosted control, Panel layout and some UII project templates as well). You can explore the projects based on your free time to see what is there as part of these projects. But for now, lets create a new USD Custom Hosted Control project.
Go ahead and create a new project with “some” name. I have selected a name CustomControlDemo for this blog post.
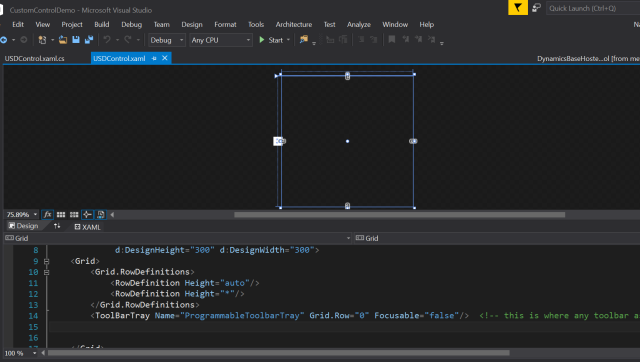
Once after creating the project you can see a sample control named USDControl.xaml opened with a high probability of showing “Invalid Markup” error. No need to worry about that, All you have to do is Just Build the project. When you build the project, Visual studio will restore all the Nuget references added to the project and your project should build successfully and should show the window like this.
Before jumping into our requirement lets quickly review the OOB code what we got in the control.
- We can see in the XAML there is a ToolBarTray control provided for us, which holds the toolbar buttons if we create any for this control. Refer this post from Neil The USD Guru if you want to know about Toolbars in USD.
- If you go to the code behind (F7) window, you can see 3 overridden methods (apart from default constructor).
- DesktopReady – This method will be called once the USD is completed loading with all its hosted controls visible on the UI.
- DoAction – This is one of the key method that we keep using to do some “fansy” stuff when a specific action fired. System will notify the action along with parameters which we can use and do the work we want to perform, It can also return the values back to USD.
- NotifyContextChange – Whenever there is a change in the context (it could be because of a new session started, session switched or Session closed) this method fires so that we can do the necessary work.It is unlikely that we will be using DesktopReady & NotifyContextChange events often, Most of the times DoAction it self will do the job for us.
- If you want you can delete the ToolbarTray control as we don’t have any tool bar requirement for this post. Remember if you are removing it in XAML, you also need to remove the code-behind references of it. I don’t see any issue, even if we keep it as it is.
- Now that we have the control ready (of course an empty one) keep it aside and lets go ahead create the Hosted control in the Configurations as well.
- Navigate to CRM >> Settings >> Unified Service Desk >> Hosted Controls
- Click on New Hosted Control ribbon button and create a new hosted control with following details
Attribute Name Value Remarks Name CustomControlDemo Any name would work. Order 100 Display Name Contact History Some meaningful name to show as Tab Name, If left empty the Actual Name will be displayed Component Type USD Hosted Control This should be the component type for all Custom USD Hosted controls Application is Global No If mentioned Yes, The application would load by default with USD as a Globally hosted application. Or else, will start only if there is a session Display Group MainPanel Specify the panel where we want to show the control. If left blank then will be considered as MainPanel Application is Dynamic No If No, The control will be loaded automatically whenever a session starts. If Yes, the administrator should provide some sort of button/event to trigger the application loading Assembly URI CustomControlDemo The project name which we used in Visual Studio Assembly Type CustomControlDemo.USDControl The class name of the control, If you are using OOB control created by Project template then “USDControl” is the name that you will get - Save & Close the form to create the new hosted control.
- Now that we have the control ready and the configuration ready, the left out part is to copy the libraries in to the USD folder.
Note: The ideal way of doing it is to place the libraries as part of ‘Customization File’ entity in USD. However, as we are still in developement stage it is easy for us to copy paste the libraries in to USD folder rather than ZIPing them and uploading as attachment every time.I would prefer it that way, but it’s up to you 🙂
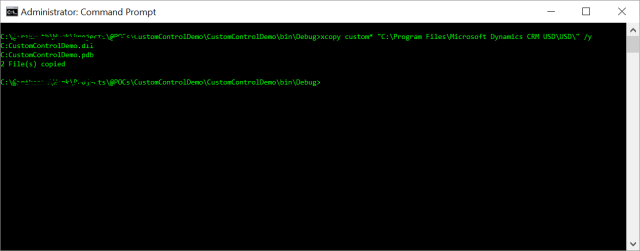
- Go to the Bin folder of the Visual studio project, Copy both <<ProjectName>>.dll & .pdb file (in my case it is CustomControl.dll & CustomControl.pdb) files in to USD installation folder (typically it is “C:\Program Files\Microsoft Dynamics CRM USD\USD\”)
Quick tip at this point:
During development period, it is not uncommon to copy these files multiple times in to USD folder. Generally we will keep on doing changes/fixes and copying them in to USD folder. One quick way I used to do to reduce these copy/paste time is, Open a Command prompt (In Administrator mode) and use Xcopy method to silently copy/paste the files. Checkout the below image once..
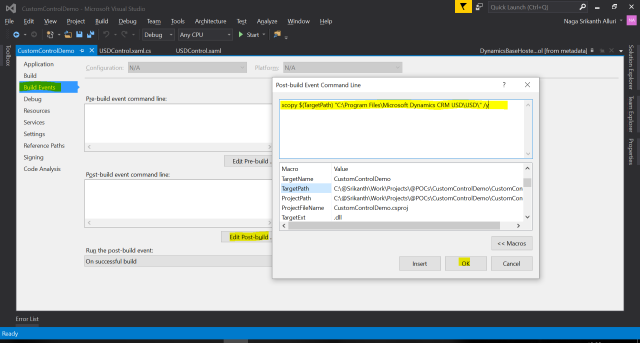
You can even copy this as Post Build script so that, it would automatically copy the files when a build is success.
Just open once the USD and start a session, you should see the custom hosted control with in a tab with name Contact History.
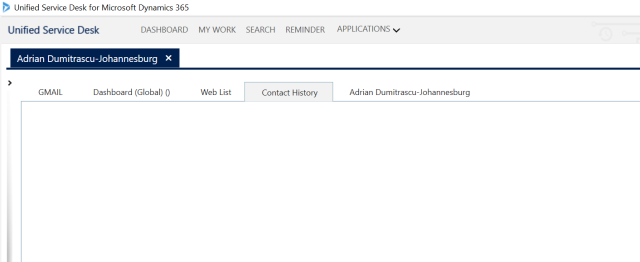
For now it is an empty control, but we will soon place some controls in to it and wire-up events to create records. I will stop it over here for now.
In the next post, I will explain the XAML required for it, how do we get the replacement parameters from context and how do fire events etc.
Catch you in my next post, till then – Happy coding !!

Pingback: Create Custom USD Control – Part 2 (Replacement parameters in C#) | CRM Ramblings
Pingback: Create Custom Hosted Control – Part 3 (Firing USD Events from C#) | CRM Ramblings
Please provide me sample project for this.
LikeLike
Hi Bharat
As mentioned in the blog post, If you can install the SDK Templates then you will get the sample project along with sample source code as well.
If it is not helping out, let me know what sample exactly you are looking for.
-Srikanth
LikeLike
Thanks for the prompt. I’ve a requirement. I’ve to connect Skype for business calls with Microsoft Dynamics USD. I have created separate external application where i’ve written code for Skype for Business and which plays middle ware application role. and its working fine but i need to host the application inside USD so using the option under USD in the organisation i.e customization file where i am uploading the zip file .I am totally new to this so is the right direction or do i need to build a cti control for this .Main requirement is when person calls via Skype for business then his record of CRM should appear in USD client .
PLEASE SUGGEST How to proceed for this requirement.
LikeLike
Hi Bharat,
for the above requirment
Please follow the following steps :
1.Create a custom hosted control using the template in visual studio to integrate skype and build the project.
2. To host this custom control inside USD CLIENT .
create a folder to make a zip which will include the follwoing
a) project build in visual studio> go to bin folder >copy the dll
b) create a xml file i.e [Content_Types].xml
c)Microsoft.Office.Uc.dll
d)Microsoft.Lync.Model.dll
Zip the folder
3. Go To CRM organisation > Settings>unified service desk>customisation files >create new record and upload the zip file .
4.Settings>unified service desk>hosted control>click new
enter the details under fields
1.Name-Any name can be given here
2.usd component type – usd hosted control
3.Display name – as per your need ,this name will appear in the panel in usd client
4.Application is global- checked
5.Display group -MainPanel
6.Assembly Uri- ur project dll name
7Assembly type – projectdll.classname
3.launch the USD CLIENT and the uploaded files you can see at location
C:\Users\userid\AppData\Local\Microsoft\UnifiedServiceDesk\USD
LikeLike
Hi ,
i am using lync sdk .for skype integration and skype for business through which call will be made
and following the code and sampe code present in sdk and using the link which has the same code
http://mscrmshop.blogspot.no/2015/05/cti-integration-between-crm-usd-and.html
now when i debug this external application , it gives only email in inviterUri expression i.e sip:xxx@yyy.com
and same code i am using in custom hosted control and zip files are uploaded in customization file section in unified service desk .
i need to do the same through phoneno for the entities account ,contact ,lead but why is phoneno of skype user not comming in inviteUri.
please guide on this .
LikeLike
hi , i am facing an issue and i checked in logs
its says failed to find the non responsive child process.
is there any way to resolve this issue .
LikeLike
When are you getting this error?
LikeLike