
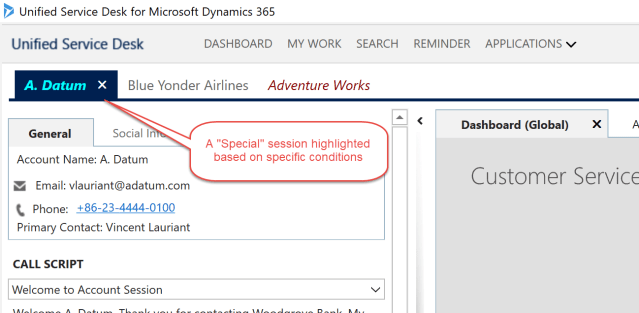
The other day, came across this specific requirement to “highlight” session with a different colour for specific customer types. At first thought that is weird requirement, but after keep revisiting the requirement couple of times that does seems to be a good and not really an uncommon requirement. Take the examples – you want your agents to talk carefully with an already angry customer, a customer with some disabilities/specific needs, an old customer…lot many, In all these scenarios alerting the agent with a “prompt” notification without disturbing his/her regular flow of interaction – improves Agent experience with the application.
Now that we saw the problem – what is the solution? Thanks to @sid who gave this brilliant idea of using XAML in places where you didn’t even think of earlier. Yes – instead of simple traditional text information as session name we can use XAML to build Session name.
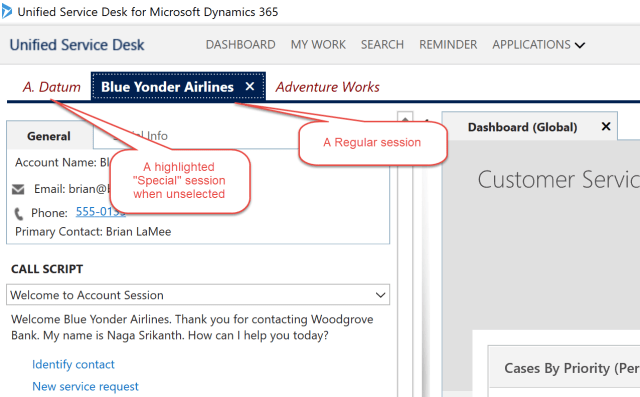
And the end result –
How do I –
Well.. Technically it is a NO CODE solution (considering C# as code 😊), But one should still have some XAML knowledge to go ahead with this kind of solution. Let’s get in to Action…
Step 1: Alter your session lines as shown below… (Note: for the sake of simplicity, I’m considering only Account sessions. You can replicate the same across all types of sessions or even can make it as a common one).
<Grid Margin="0" xmlns:x="http://schemas.microsoft.com/winfx/2006/xaml"
xmlns:CCA="clr-namespace:Microsoft.Crm.UnifiedServiceDesk.Dynamics;assembly=Microsoft.Crm.UnifiedServiceDesk.Dynamics">
<TextBlock Text="[[account.name]+]"  >
<TextBlock.Style>
<Style>
[[$Scriptlet.SetUpSpecialSession]+]
<Setter Property="TextBlock.FontFamily" Value="{Binding Path=FontFamily, RelativeSource={RelativeSource Mode=FindAncestor, AncestorType={x:Type Label}}}"/>
<Setter Property="TextBlock.FontSize" Value="{Binding Path=FontSize, RelativeSource={RelativeSource Mode=FindAncestor, AncestorType={x:Type Label}}}"/>
<Setter Property="TextBlock.FontWeight" Value="{Binding Path=FontWeight, RelativeSource={RelativeSource Mode=FindAncestor, AncestorType={x:Type Label}}}"></Setter>
<Style.Triggers>
<DataTrigger
Binding="{Binding IsSelected, RelativeSource={ RelativeSource Mode=FindAncestor, AncestorType={x:Type TabItem}}}"
Value="False">
[[$Scriptlet.SetUpSpecialSession-Unselected]+]
</DataTrigger>
</Style.Triggers>
</Style>
</TextBlock.Style>
</TextBlock>
</Grid>
My Account Session line is now like this
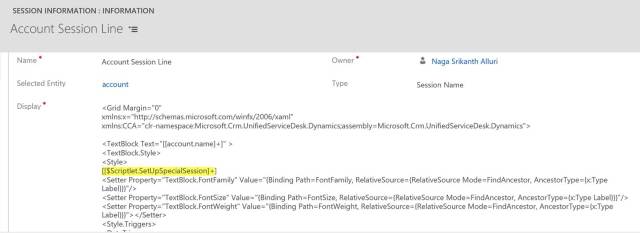
Notice the highlighted Scritplet, That’s the one that actually does the magic. Let’s quickly walk through the XAML first.
- At the top level, it’s a grid with some name spaces added to it – purely for USD to know that there is some XAML code following that should be rendered properly using the namespaces.
- Next to that a TextBlock element – which is the actual place holder for the Session Name. You might have to do some modifications over here to have your specific session naming convention. This is the key element, all we will be doing further is Stylizing this TextBlock.
- Set up the style with this specific Scriptlet – SetupSpecialSession, Which during the run time will return what foreground colour the session should be.
- Rest of all the all lines are just to setup the other properties like font size, family etc from the parent control (the actual session style).
- There is one DataTrigger also there, which will be triggered when the SessionTab is Unselected (moved out to a different session). This would then set a different text colour (DarkRed, If you see the post Image). We have used another scriptlet for this purpose.
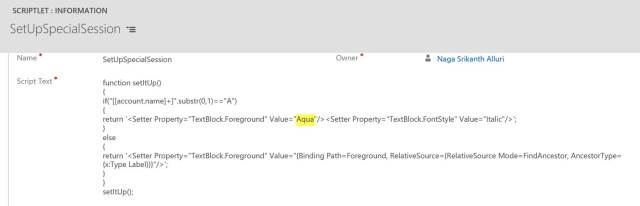
Step 2: Create a Scriptlet with name “SetUpSpecialSession”. If you are altering this name, you should alter the name in the above XAML as well. Also, for the sake of simplicity – I have selected my condition for the special session as “First character of Account name should be A (I know that’s a crazy condition 😊)”. Here is the Script Text
function setItUp()
{
if("[[account.name]+]".substr(0,1)=="A")
{
return '<Setter Property="TextBlock.Foreground" Value="Aqua"/><Setter Property="TextBlock.FontStyle" Value="Italic"/>';
}
else
{
return '<Setter Property="TextBlock.Foreground" Value="{Binding Path=Foreground, RelativeSource={RelativeSource Mode=FindAncestor, AncestorType={x:Type Label}}}"/>';
}
}
setItUp();
Simple, Stright forward JS. If first character of the account name is A then return TextBlock’s Foreground as Aqua and FontStyle as Italic. If not, just set the Parent lable’s Foreground (which is nothing but the default session colour). This is where you have to select your “Special” session colour. Mine is Aqua. My scriptlet in CRM looks like
Step 3: Just like in previous step, create another Scriptlet with name “SetUpSpecialSession-Unselected” and the script text as
function setItUp()
{
if("[[account.name]+]".substr(0,1)=="A")
{
return '<Setter Property="TextBlock.Foreground" Value="DarkRed"/>';
}
else
{
return '<Setter Property="TextBlock.Foreground" Value="#666666"/>';
}
}
setItUp();
Nothing fancy- when executed and matches my special condition set up the foreground as DarkRed else default it to default colour.
The key point with this scriptlet is the placement of the scriptlet. Check the XAML which we created in step1, it has been placed in the DataTrigger and under the trigger condition – Tab’s IsSelected=False.
That’s it, we are done. Try opening the USD and see the sessions colour difference when they are starting with A and not with A.
Thought it would be helpful for every one and so here are some key observations during the development –
- For some yet “unknown” reasons, If I’m ending my Setter tag with “/setter>” it is not working rather it should be ended with “/>”
- The XAML should not have any empty spaces before. This took quite a lot of time to figure out the issue.
- I’m not an expert in XAML, so you may be able to see even simpler way of achieving the same functionality. If so, Please post in comments.
- If you want to play with the styles even further – With USD SDK, Microsoft shipped the default styles.xaml file. You can look at all the key styles that MS used for USD Styling.
Hope this helps, happy USDing 😊..
